Monday, March 15, 2010

The Importance of Woodworking Clamps

          Sometimes we take for granted the very things we cannot live without. Only, on the rare occasion where one of these things is not present do we realize its overwhelming importance to us. Some of these things are crucial to life support like air, gravity, water, food and even, it could be fairly argued, love. Others, while not fatal to us (if missing) are, nonetheless, crucial necessities to life as we know it. An example of this would be ball bearings which are used in cars, trucks, airplanes, ships, motors and machines. Another, to the woodworker, would be clamps, the subject of this present discussion and tool review.


          I want to point out that woodworking, as we know it, would simply cease to exist without clamps to hold wooden parts together while we are gluing or otherwise fastening them together. It’s not that there is anything in what I have said so far that is news to anyone. It’s simply a matter of being conscious of the value of things that bless us every day of our lives.


          I once sold off the entire contents of a woodworking shop. I advertised each tool individually. The ads were hardly out when I received a flood of calls from woodworkers looking for clamps. I sold all the clamps I had the first day. It was then that I realized how much every woodworker needs clamps.


Bob Gillespie
Woodworker

For similar articles and tool reviews see:
http://www.perfectwoodworking.com/


©2010 Robert M. Gillespie, Jr.

Does a Planer Belong in Your Workshop?


          In the “old days” (whenever that was) lumber was simply sawn out of logs and left to air dry. If you wanted to be able to see the grain so that it could be matched with other boards, it had to be planed. If you wanted it planed, you needed a long bed hand plane and a lot of skill. With the invention of the planer, no one needed to plane boards by hand any more and the practice stopped in the name of “progress.” Today, most boards are delivered already thickness planed and some are even straight line ripped on one edge, making things very easy for the woodworker. So, why own a planer?


          Thickness planing does not end at the lumber yard. Lumber, once edge glued into panels is still uneven and the boards are never in perfect alignment with each other. Something must take this rough panel from, say, 1 7/8” down to its final thickness of , say, 1 ½”, smooth both sides. There are two ways of doing this that I know of: an abrasive planer (wide-belt sander or drum sander) or a planer that uses knives in a cutterhead.
          A combination of a knife planer and an abrasive planer would be ideal but not always affordable. This is because planers have a way of tearing chips out of loose grain. They are, however, much faster in removing material than a sanding machine. A sanding machine will never tear out chips but it may use up a lot of valuable production time. So, in an ideal world, where money didn’t matter, you could do most of the thicknessing with the planer and then finish up to the final thickness dimension with the sanding machine.


          In fact, if you have the money and need to do your woodworking on an industrial scale, there are machines with a planer head followed by two or more sanding heads. I had the chance to use such a machine for several years. A friendly competitor bought it for his woodworking firm in Hawaii and had it shipped in by ocean freight from the mainland.


         This giant machine, made by Cemco, used 880 volt, 3 phase motors. A ten HP motor ran the conveyor belt and the one planing and two sanding heads each had 60 HP electric motors. It could plane and sand panels 52 inches wide. In size, it looked like a large, industrial printing press. My friend bought into a sawmill and had Hawaiian Koa wood shipped by barge from the Big Island to Oahu where he had constructed a dehumidification kiln next to the Cemco machine. Eventually, he over-extended himself financially and had to close his business. He found a buyer for the planer/sander but he had to ship the huge machine all the way back to the mainland because no one in Hawaii had a use for such a machine. Of course, I don’t know what your plans are for a planer but I’m pretty sure you won’t be buying a Cemco any time soon. That still leaves a lot of sizes and types of planers to discuss.


          A planer/jointer uses the same cutterhead for planing as it does for jointing. It looks like a jointer but it also has a space underneath the jointer table where you insert boards for planing. You feed the boards in one direction on the jointer table, above the cutterhead, and in the opposite direction through the planer underneath the cutterhead. This is because the cutterhead only spins in one rotational direction. A planer, if it has molding capability becomes a molder simply by removing the straight knives and replacing them with profile cutters.


          Most planers are constructed with the cutterhead mounted in the top part of the machine and a metal table with rollers underneath the lumber being planed. The thickness is adjusted by raising and lowering the table with relationship to the cutterhead above. The lumber is driven through the machine by the front roller or rollers which are usually serrated for better grip. The outfeed rollers are at the same height as the infeed rollers but they are usually not powered and are shiny and smooth. There are some large, expensive planers in which all rollers are powered.


          There are three types of cutterheads: straight knife, spiral and helical. The terms “spiral” and helical are often used interchangeably although this is inaccurate. There are strong similarities between the spiral and helical types but there IS a difference as I will explain. Straight knives are used on most planers in the less expensive range. For the most part, straight knives are fine but they do have two drawbacks: they are difficult to align with each other after changing and they tend to tear out loose grain more easily.


          Helical and spiral heads get around both problems to a large degree. It has been found that a bunch of small cutter blades arrayed in a spiral wrap around the cutterhead will minimize splintering. Helical knives are usually square or rectangular in shape and sharpened on either 2 or 4 sides. They are mounted directly onto the face of the cutterhead and, thus, require no adjustment to align them with each other. To change a cutter in a helical head, you simply remove the screw that holds it in place. If there are unused edges on the cutter, you can rotate that cutter to exposed the new edge to the wood and then replace the screw. You buy cutters by the box and replace them as needed: Sometime you replace just a few that have become nicked. At other times, all cutters have been dulled on all sides and it is time to replace them all.


          The spiral cutterhead is different from the helical head in that Spiral Planer Cutterhead, a whole row of cutters, connected together in a flexible strip are attached to the spiral head, One row at a time. There are spiral tracks or indentations in the heads that locate the cutter strips. There may be three or so tracks on a spiral cutterhead. Helical cutterheads are much more common than spiral heads.


Bob Gillespie
Woodworker

For similar articles and tool reviews see:

http://www.perfectwoodworking.com/


©2010 Robert M. Gillespie, Jr

What to Look for in a Cordless Drill

          The original cordless drill had neither a motor nor a battery. There was a hand drill in my father's workshop long before he invested in an electric drill with a cord. The first battery-powered drill was the tool that started off the cordless revolution which eventually caused all sorts of tools to become available in cordless models. Some types of tools are more suitable to cordless use than others. Usually those tools that move around a lot in use and do not require large amounts of electricity are the best candidates for battery power. So, the electric drill, by its very nature, was the first tool to get a battery.


          Drilling a Hole When you are using a drill at many different locations, it’s a real pain to have to drag a cord around with you. At first, cordless drills weren’t very powerful and the batteries didn’t last that long. For a while, that was an excuse for woodworkers to resist the upgrade to cordless. Today’s cordless drills, especially in the 18 Volt class are both powerful in terms of torque and their lithium ion batteries are long-lasting. The chargers are fast and so, with two batteries to switch off, it’s hard to run out of juice.


          So where do different models of cordless drill stand apart from one another? Actually, in several areas, the most important being tool weight and twisting power or torque. It used to be a rule that if you wanted more power and/or longer battery life, you had to accept heavier tool weight. While this is still true, in a general sense, important inroads are being made by major drill manufacturers to turn this equation around.


Drill at Arm's Length


          Tool weight is important in a drill or impact driver because these are tools that you hold out at arm’s length all day and while 5 to 10 pounds may not sound like much, each weight increase from drill to drill counts for a lot at the end of a long day on the job even if your name is Hercules.

          Power is important because drills are often used to drive screws even though there is a better tool for that job: the impact driver. Most 18 Volt cordless drills come with half-inch chucks and if you have ever drilled a deep ½” hole in hardwood, you know the need for power. You might even find yourself driving a large Forstner bit which is a lot more than 1/2". You don’t want to buy a drill that will bog down on the job.

          A drill is the kind of tool that a woodworker uses the most and so it is important to put on your thinking cap to make sure that you are buying the right one for your needs.


          Cordless Drill Battery Battery size, expressed in amp hours is another important consideration. All Lithium Ion 18 Volt batteries are not alike in terms of size, weight or how long they will last between charges. That goes for chargers, as well. A half-hour charger, as opposed to an hour charger can make a real difference if you are constantly changing batteries.

          When you comparison shop the brands, you will note that drill power and drill weights are all over the place. So are the prices. You can save by buying factory-reconditioned tools but don’t buy an underpowered drill with a small battery just to save money. Don’t buy an overweight drill just because it has a bit more torque than its lighter competitor. Get the drill you need. You will thank yourself later.


Bob Gillespie
Woodworker

For similar articles and tool reviews see:

http://www.perfectwoodworking.com/


©2010 Robert M. Gillespie, Jr.

Do You Need a Router Table or a Shaper in Your Workshop?

          Depending on how you look at it, there’s either no difference between a shaper and a router table or a there's great deal of difference. They are the same in that they both work by projecting a cutter or bit up through a hole in the table. The work piece is then run along a fence and through the cutter, producing a profile on the work piece matching that of the cutter.


          In, many other ways, however, they are quite different. The first question you might want to consider is: “Considering the type of woodworking I do (or I am likely to do) in the future, do I need a shaper or will a simple router table do the trick?” What will determine the answer to the question is the size of the profiles you want to create. You do not need to own both a shaper and a router table since many shapers can also spin router bits. However, you cannot spin shaper cutters on a router.


          If you are used to working with routers and router tables, one of the first things you will notice the first time you turn on a shaper is how much quieter it is. The high-pitched whine of the router has been replaced by the quieter whirr that is characteristic of the shaper. The reason for this is two-fold: First, most shapers turn at slower RPMs (7000, to 10,000) than routers which scream along at 20 to 25 thousand RPM. And yet, when you consider the tip speed of the larger shaper cutter as opposed to the router bit, there may not be that much difference in speed at the actual point of cutting. Second, routers are direct drive while shapers use the quieter belt-drive system of rotation.


          Because shaper cutters are so much larger than router bits, they are attached to the shaper differently than router bits are attached to a router. Shapers use heavy metal spindles that are firmly attached into the shaper at the bottom of the spindle. Spindles usually come in 4 sizes: 1/2", 3/4", 1”, and 1 1/4" diameters. Some machines only include one spindle but others supply two or more. There are two types of spindles: “solid” and “interchangeable.” An interchangeable spindle has a hole in the top end which allows you to mount smaller diameter spindles and even router bit collets. An interchangeable spindle can also hold shaper cutters.


          Solid spindles are used only for shaper cutters. Cutters, spacers, rub collars and/or ball bearings are dropped onto the spindle shaft from above and then secured with a large, provided nut. The capacity of a shaper spindle is expressed in available space “under the nut.” The greater the capacity, the more cutters and spacers can be accommodated. Another important figure to look at when shopping for a shaper is the amount of “spindle travel.” This figure relates to how high or low the spindle can be with relationship to the table top. This relates to the maximum thickness of work piece that can be shaped with a profile. Multiple cutters can be put together to create different profiles.


          Generally speaking, the largest shaper cutters work better at lower RPMs. Most shapers will offer you two different speeds. The more expensive shapers may offer you as many as five. Changing speeds is done by moving the drive belt into another pulley position as on a drill press. And, like the drill press, belt tension must be slackened before this can be done. On most shapers, this is accomplished by simply moving a lever that releases the belt tension, then, moving the belt into another pulley position and finally, by moving the lever back to its original “tight” position.


          Most shapers come with grooves for a miter gauge in both the table and the fence. This is to allow small pieces to be shaped safely and effectively. Another piece of equipment relating to safety is the “starter pin”. This is a metal pin, threaded on one end that screws into a threaded hole in the table near the location of the cutter. It gives you a place to rest the work piece against when beginning a freehand cut.


          In a router table, there are two types of router bits you may use: (1) with or (2) without a ball bearing guide. If there is no ball bearing guide on the router bit, you MUST use the router table fence. Same with the shaper. The shaper may use a “rub collar” or a ball bearing on the spindle shaft to prevent the work piece from being drawn into the cutter deeper than the profile. If you are using a cutter without a rub collar or ball bearing, then you will need to use the fence that is installed on the table. The infeed portion of the fence is set further away from the operator than the outfeed fence. This difference determines the depth of cut. Most shapers allow you to “micro-adjust” the fence settings for perfect results.


          When shaping irregular (not square) work pieces, you will have to work freehand which is inherently more dangerous than using the fence. To do this, you will probably need to remove the fence or, at least, set it back, out of the way, toward the rear of the table. You will need to construct an alternate kind of safety guard and this can be made from a round piece of 3/16” or thicker Plexiglas with a hole drilled through it at the center point. This guard must be a bit wider than the swing of the cutter. It should be mounted at the top of the cutter or cutters on the spindle and then fastened down with the spindle nut. Keep your fingers as far away from the cutter as possible while maintaining a firm grip on the work piece at all times. With the rub collar or ball bearing installed, you can press the work piece into the cutter without worrying about going too far.


          A shaper can be an extremely dangerous machine if not used properly. Anything I say in this piece or anywhere else should NOT be construed as giving advice that could lead one to do anything dangerous, harmful, injurious or fatal. In, fact, I would say that if you are ignorant of the dangers present in woodworking or are not willing to take the necessary safety precautions, then you should immediately give up woodworking and never go near a woodworking machine again. Here are some precautions you MUST take when using a shaper in the interest of your safety and that of others in your shop:


          1) ALWAYS use some sort of guard or, even better, a power feeder. A power feeder will completely cover the cutter danger area and will push the work piece against the fence as it pushes it through the cutter. Buy a power feeder and use it whenever you can. When the operation precludes the use of a power feeder, at least use an effective guard. Most shaper fences come with guards. Use the guard!


          2) Most shapers can be run forward or reverse. This is because some cutters or cutter configurations require that the shaper be run in reverse. Before you start any cut DETERMINE THE PROPER DIRECTION OF ROTATION for the cutter or cutters on the spindle. Then check and double-check that the machine is set to the proper cutting direction. If you feed a work piece into a shaper WITH the direction of rotation instead of AGAINST it, the shaper can easily pull the work piece out of your grip and send it flying like a missile through your shop with possible FATAL results.


          3) NEVER shape small or thin pieces. Instead, shape a larger piece of wood than you need and then rip off what you need on the table saw. Small pieces can also easily become missiles. Further, they will cause your fingers to be way too close to the cutter and if they slip, they may cause your fingers to go into the cutter.


          4) USE A STARTER PIN when doing free hand work with irregular work pieces. It will give you much greater control and may prevent kick-back.


          5) USE A MITER GAUGE WITH A HOLD_DOWN CLAMP whenever shaping the ends of narrow pieces like table or chair legs. To attempt this without a miter gauge and clamp is asking for a trip to the emergency room.


          6) USE JIGS WHENEVER POSSIBLE. A jig is a shop-made or other device designed to guide cuts for consistent and safe results.


          7) USE EYE AND EAR PROTECTION and wear a DUST MASK. The reasons should be obvious.


          One more piece of advice, although this doesn’t relate to safety as much as it does to work piece conservation. Always shape (or rout) the end grain of a square or rectangular work piece first and then rout along the sides. This way, you have a good chance of shaping or routing away the chip-out at the end of the end grain as you clean up the sides. Also, if you are shaping end grain, try to clamp a back-up board to the work piece so that it passes through the cutter immediately after the work piece, thus preventing chip-out. If you can afford it or think you might be doing a lot of end grain cuts, consider a machine with a sliding table. In a mass production setting, it can pay for itself quickly in time saved and repeated accuracy.


Bob Gillespie
Woodworker

For similar articles and tool reviews see:

http://www.perfectwoodworking.com/


© 2010 Robert M. Gillespie, Jr.

How to Get the Most Out of Your Band Saw

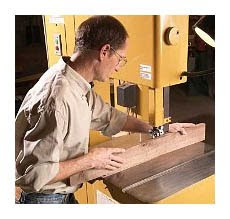
          Any band saw can resaw. The question is: “How well and how thick?” The first thing you need to decide if resawing on your band saw is an activity in which you are likely to engage frequently, occasionally or never. For those of you who don’t know, resawing is the ability to cut thin slices or veneers out of a board standing on its edge on the band saw table, while being guided along a high fence. Where this pays off is when you are trying to get maximum mileage out of an especially fine, beautiful, expensive hardwood board.


          For example, I made a lot of jewelry boxes with 3/8” thick sides. Considering that I had to sand all of the sides flat and smooth, I found that I could barely get 2 slices out of a 1” thick board or 3 slices out of a 1 1/2” board or 4 slices out of a 2” thick board. You need to allow 1/16” kerf waste for most band saw blades plus more if your blade wanders, which all blades do to a certain extent. Then all unevenness has to be sanded away in a drum sander or wide belt sander. In the end, you can't realistically expect to get two finished 3/8" box sides out of a board that is only 3/8"+3/8" +1/6" = 13/16" thick. You will need not much less than a full 1" thickness in your original board. Since most hardwood lumber is sold milled down to 7/8" for a so-called 1" board, you are faced with only getting one, 3/8" slice, not two. On the other hand, most 2" lumber comes milled down to 1 7/8", which allows you to bet three 3/8" pieces out, saving you money.

          The more your band saw blade wanders, the more thickness you will need. The important thing is to minimize this wandering and there are five ways to do this: (1) blade tension (maximum recommended to keep the blade from flexing), (2) blade width (the wider, the better for stiffness), (3) blade type (designed specifically for resawing), (4) motor power (to drive the blade through the wood without bogging down) and (5) blade guides (the more blade control, the better).


          If you plan on doing a lot of resawing, pay close attention to the specifications of band saws you are considering for purchase, in light of what has been said above. If resawing doesn’t look like it will play a large part in your future, then you are probably more interested in cutting curves in thinner material. In this case, throat depth of your band saw becomes a very important consideration because, on a small band saw, you will be constantly bumping into the back of the throat and you may not be able to complete the curved cuts you have penciled out.

          Any 14-inch band saw will severely limit the width of cuts you can make to the left of the blade, so consider if this will present a problem for you. If you are planning on just cutting out small parts, fine. On the other hand, if you want to make large parts for furniture, then a small band saw just won't do. Of course, there is no limitation to the right of the blade, on a 14" (or any other) band saw, except that you will have to supply auxiliary support for your work piece if it extends very far off the edge of the table. Throat depth is not so much of a problem when you are using the band saw for resawing, although, for resawing, you will need to consider the maximum distance between the table top and the upper blade guide. That measurement determines how wide a board you can resaw on your band saw.


          When shopping for a band saw, don’t be fooled into thinking that an 18” band saw will give you a full 18” between the blade and the back of the throat. Band saws are measured by the outside diameter of their wheels. These wheels are mounted inside the cabinet, one above the table and the other, below. Actually, there is an upper cabinet and a lower cabinet connected by a “column”. The blade travels upwards from the lower (powered) wheel through and inside the column to the upper (idler) wheel before reversing direction and going downwards through the upper blade guide, then the table, then the lower blade guide before returning to the lower wheel.

          Because the column takes up a certain amount of space, an 18” band saw will not normally have a full 18” throat. It will be something less than that, perhaps 17½” (if you are lucky) or even 17”. So, if you need a full 18” of clearance, you will need a 20” band saw. Prices climb with throat depth simply because as throat depth increases, the wheels and the cabinets must increase in size accordingly. In short, the whole machine gets bigger.

          Small band saws with small wheels may not be tall enough to sit on the floor like larger ones. With small band saws, you must either mount them on a bench or purchase or build a stand. Usually the stand is included in the price of the smaller saws. Conversely, when working on a very large, industrial band saw, count on the table top being quite high off the floor to accommodate the lower wheel and its cabinet.


          When you order blades for your band saw, do so in quantity. There are few sure things in life but blade breakage is guaranteed. Always have replacement band saw blades on hand so you don't end up breaking your only blade right in the middle of a project. When you do order blades, you can usually find the best prices online but you will need to allow for delivery time and shipping costs. You can buy blades from the saw manufacturer but it is usually cheaper to purchase them from a vendor who specializes in band saw blades. If you can’t find the exact size your band saw uses, you can ordinarily have your blades custom-welded to any length you need.

          There are times when you want a specialized band saw blade for a specific use like resawing. Here, the challenge is to get a reasonably smooth cut but not to have so many teeth that it causes an undue amount of friction, heat and wandering. In a case like that, it may be best to buy directly from the manufacturer of your band saw. Band saw blades designed to cut tight curves are as narrow as 1/8”. For most curves, I have found 1/4" blades to be sufficiently narrow. The narrower the blade, the more likely it will be to break quickly but it can track tighter curves than wider blades. For really tight curves, a scroll saw may be a better tool than a band saw. Resaw blades should always be as wide as your band saw can accommodate.

          There are two basic types of blade guides on band saws: "blocks" and "ball bearing guides". Blocks can be made out of smooth metal, non-metallic composite or ceramic material. Ball bearing guides are more expensive but are much easier on blades in that there is minimal friction and, therefore, reduced heat. There are side guides in any band saw to restrain the blade from moving left or right and a single block or bearing behind the band saw blade to keep it from moving backward when pressure is applied to the front of the blade by the work piece. After-market ball bearing guides with full installation instructions can be obtained from manufacturers such as Carter. The more expensive band saws come already equipped with ball bearing guides.

          Like other stationary power tools, very large band saws usually have three phase motors. You should not consider purchasing one of these unless you have three phase power available at the place where you will be using the saw. Three phase power is usually only available from the power company in commercial or industrial areas and cannot be found in residential areas. The only way to have three phase power in a home woodworking shop is to use a phase converter that is large enough for the power requirement of your largest three phase motor. If you plan on running more than one three phase motor at a time, you will need a correspondingly larger phase converter. There are two types of phase converters: rotary (looks like a big electric motor) and electronic. Rotary is better if you can find it. Search for phase converters online.

          A two speed band saw is useful if you are planning on cutting metal or very dense hardwoods. Running the band saw on the slow setting will mean that while it will take longer to make cuts, it will reduce heat from friction and extend blade life. Metal cutting band saw blades are widely available for cutting mild steel and non-ferrous metals. Never use a metal cutting band saw blade to cut wood. Never use a wood-cutting band saw blade to cut metal.

          Some band saw wheels are bare metal. If you want to track narrow blades, your band saw wheels should have rubber “tires” that are glued onto or inserted into grooves in the metal band saw wheels. These tires are usually crowned. By adjusting the blade tracking device, you can get the blade to stay in one position on the tires or metal wheels.


          Another adjustment moves the upper band saw wheel up and down to increase or decrease blade tension. You will need to release this tension to change band saw blades and, on the newer band saws, you can usually find a lever that does this for you. If not, you will have to loosen the tension knob enough to install a new blade on the wheels. Then re-apply the tension, using the blade tension scale, appropriate to the blade width you are using. Wide blades will require more tension than narrow blades. Narrow blades can break if too much tension is applied. Large band saw blades can wander off the band saw wheels if insufficient tension is used. Always refer to the tension scale on your band saw. Don't guess.

          After the band saw blade is tensioned properly, disconnect power to the motor and turn the upper wheel by hand to verify that the band saw blade is tracking properly. If not, make appropriate tilt adjustments to the upper wheel until the band saw blade stays in the approximate center of both wheels. A hand wheel or knob is provided on any band saw for this purpose. If the wheels are slightly out of alignment with respect to each other, you can still track a band saw blade. In this case, the band saw blade will be more to the back of one wheel while being more to the front of the other wheel. This discrepancy should eventually be adjusted or "tuned" out of your band saw, but, for now, it’s OK as long as the band saw blade stays on the wheels while cutting. Once you have the band saw blade tracking properly, reconnect the power and start cutting.


Bob Gillespie
Woodworker

For similar articles and tool reviews see:

http://www.perfectwoodworking.com/


© 2010 Robert M Gillespie, Jr.

Three Kinds of Circular Saws for Three Different Jobs

          While there are many types and sizes of circular saws on the market, I would like to discuss what I believe to be the three most important categories. They are: plunge saws with guide rails, worm drive or hypoid saws for construction use and standard-drive circular saws suitable for both home and construction use. Before I delve into all of that, however, I’d like to take a quick look at the basics.


          A circular saw allows you to take a relatively small tool to a large work piece and cut it without too much back-breaking labor. In the past, the price for this convenience was inaccuracy because there was no really easy way to force a circular saw to cut straight along a pencil line. For rough construction work like roofing and decking, this was no problem. For fine woodworking, however, the circular saw was not the tool of choice. Most woodworkers rely on the table saw to get the long, straight cuts they need and for good reason. The fence on a table saw gives the constant reference point needed for straight cuts.


          Sometimes, however, using a table saw to trim the top of a huge conference table, for instance, turns out to be an impossible task, especially when trying to trim off the ends at 90 degrees to the sides. That’s when a very carefully planned approach using a circular saw seems to deliver the best final result. I would draw a pencil line using a long straightedge exactly where I wanted the trim cut to go. I would then carefully measure the distance between the inside (or outside) of the saw blade and the edge of the foot plate of the saw. The next step would be a second pencil line, parallel to the first one and separated from it by the distance I measured between the inside (or outside) of the saw blade and the edge of the foot plate. I would locate an absolutely straight board (ripped straight on the table saw, if necessary) and clamp this across the table top as a guide along the second pencil line. Then, I could make a pretty straight cut along the first pencil line. I would then repeat this for the other end of the table top.


          In the past few years, this process has become a whole lot easier. There are now several makes and models of plunge saws that run along metal guide rails, cutting right next to the edge of the rail without cutting into the rail itself. The guide rails don’t even need to be clamped to the surface being cut because they have material underneath that keeps them from sliding around. If you feel more comfortable clamping down the guide rail, this can be done, as well. It’s a simple matter to lay the guide with its edge along the cut line and then to take the saw and run it down the rail, cutting right next to the lip of the rail.


          Because these saws are plunge-type saws, you can begin and/or end a cut in the middle of a sheet of plywood. You could cut out a window or door opening, for instance and have it come out clean and square every time. The best thing about using these track saws is the confidence they give you: You KNOW you can do a perfect job, quickly, accurately, over and over again.


          Another kind of circular saw I’ve used a lot over the years, mostly for construction, is the worm drive saw pioneered by Skil. A framing carpenter needs to be able to cut a lot of lumber all day long. While accuracy is always desirable, it is not as critical to the framer as it would be to a finish carpenter or cabinet maker. Speed is the thing that the framer wants on his side and he (or she) does not want to be saddled with a saw that can’t cut the mustard, so to speak. He doesn’t want his circular saw to bog down in the middle of cutting a 2 x10 joist or have the sole plate hang up every time it goes across the edge of another board. He does not want to have the saw blade slipping around the saw arbor. What he wants is clean, fast accurate cuts: In short, power.


          A worm drive saw delivers the constant power he needs because there is no slack or play anywhere between the powerful motor and the saw teeth that are doing the cutting. The worm gear cuts down a bit on saw blade RPM but trades this off for torque. It is torque, more than speed, that powers a saw blade through thick, wet wood. A diamond-shaped arbor makes it virtually impossible for the blade with a matching diamond-shaped hole to rotate around the arbor. Keeping the number of saw teeth down to 18-24 teeth on a 7 1/4" saw blade also helps. The only problem with early Skil worm drive saws was the weight with those large motors and all that gearing. The solution was to use magnesium instead steel in the construction of the saw wherever possible. The modern magnesium worm drive saws weigh only about 14 to 15 pounds which is more than a standard circular saw but manageable in the strong hands of a muscular framer.


          The final category included the kind of saw that most people think of as a circular saw. It is lighter than the worm drive saws and, for most uses, it's plenty powerful enough. Some of these saws are now also be made out of magnesium parts and weigh just over 10 Lbs. This makes them easy to use by the average do-it-yourselfer. Did I mention that they are a lot less expensive than the other types?


Bob Gillespie
Woodworker

For similar articles and tool reviews see:

http://www.perfectwoodworking.com/


© 2010 Robert M. Gillespie, Jr.

The Table Saw: Heart of Any Fine Woodworking Shop

          There are many things you will want to consider before purchasing a new table saw for your shop. There are three main types of table saws: (1) the lightweight, inexpensive and portable contractor’s saw, (2) the cabinet saw, so-named because it has an enclosed cabinet as opposed to open base and (3) the new breed of so-called “Hybrid” table saws which fill the price gap between contractor’s saws and cabinet saws. This discussion will be only concern cabinet saws because, in my experience, nothing less will do for a shop that produces fine woodworking. Smaller saws lack both the accuracy and capacity of cabinet saws.


          The table saw is the heart of your shop. You will use it more than any other machine and its accuracy and capacity will determine the quality and size of what you will be able to produce. This is akin to picking someone to marry: Ideally, it’s for life and you will have to live with your decision for a long time to come. Therefore, rushing into purchasing the first table saw you see, without doing your homework, is like a quickie Las Vegas marriage, always a gamble.

          There are many things you should consider before you should consider before investing your hard-earned dollars in any particular machine. As I have said again and again, any woodworking machine you buy should be just slightly more capable than what you will demand of it now or what you imagine you would likely to demand of it in the future. While price is important, affordability should not be the sole determining factor in your purchasing decision. If you can’t afford the saw you need, wait until you can. Don’t saddle yourself with a table saw that may drive you crazy every day of your life. Take a few moments to consider what you really need and which machine will best fill the bill for you.

          I’d like to take a minute to talk about the features that you should be looking for and what these features will mean to you after you unpack and set up your new table saw. These features include: motor horsepower, blade size, trunnion construction, tabletop flatness, tabletop size, arbor size and arbor bearings, sawdust extraction, ease of operation including raising, lowering and tilting the blade, tilt of the blade (left or right), the necessity of a magnetic switch and the importance of its location, ease of access to the interior of the cabinet, accuracy and ease of operation of the fence, the amount of rip space to the right and the left of the blade, safety features and table saw mobility around the shop. In addition to the table saw itself, you may want to construct an outfeed table around the back of the saw, if space permits. We’ll talk about that, as well.


MOTOR HORSEPOWER

          Motor horsepower and blade size are closely related. The larger the blade, the more horsepower you will need to cut, at full blade height, through a piece of wood. Too much power is never a problem. Too little power can cause the saw to bind, slow down and even stop in the middle of a cut. This is not good, nor is it safe.

          The smallest motor I would even consider for a 10-inch saw would be 3 horsepower. For a 12” to 14” saw it would be 5HP and for a 14” to 16” saw, I’d like 7.5 HP. You will also need to consider if the saw motor is single or three phase. Three phase motors use electricity a bit more efficiently. If you don’t have three phase power at your location, however, you will either have to buy single phase or purchase and install a phase converter large enough for your saw motor. Most saw motors use 230 or 460 VAC power, so make sure you have available in your shop the voltage your saw will require. Three phase motors can run on 208 to 220 volts or higher, depending on the motor.


THE TRUNNION


          The trunnion is the mechanism inside the cabinet which is responsible for both raising and lowering the blade and tilting the blade for bevel cuts. It is controlled from the outside of the saw by two separate wheels or cranks: one for raising and lowering the blade (usually found on the front of the cabinet) and the other for tilting the blade (either left or right, depending on the saw) which is usually, but not always, located on the side of the cabinet.

          The trunnion determines the accuracy of your cuts so you want to be sure that it is well built and accurately machined. The saw blade must always be exactly where you need it to be. Furthermore, the trunnion must be easy to operate. It should not require Superman to raise or tilt the blade. As time goes on, you may find that it is harder to turn the wheels or cranks that operate the trunnion. This is usually because of sawdust contamination of the gears and/or lack of lubrication. Some better saws have ways of eliminating sawdust from the cabinet into an external dust port before it can get into the gears. Other saws come with self-cleaning gear teeth.


TABLE FLATNESS AND SIZE


          One table saw manufacturer I know believes in “aging” its cast iron machine table tops before milling them flat. The tops are cast and then left outside in a “bone yard” to bend, bow, warp and twist in the sun and rain for a year or so. Then, they are brought inside where all the rust is removed and the table top is ground absolutely flat and polished to sheen. The theory is that the metal needs to settle into a place where all post-casting movement has ceased and that the table should not be ground flat before this is done. Otherwise, the table may move out of absolute flatness after it is part of your new table saw and that it not at all desirable. Why? Because the flatness of your table saw top will determine the accuracy of your cuts. Be sure to check your new table saw for table flatness with a straightedge on or before delivery and afterwards from time to time. Lay the rule across the table top at all angles and check for daylight under the rule or rocking of the straightedge on the table top.


          The size of the cast iron table saw top is also important: the larger the better. When you are sawing large objects, you want as much flat table surface as you need to support the work piece flat to the blade for accuracy. Larger table size is usually accomplished by attaching cast-iron table wings to the edge of the main table. These wings must be as flat as the table and the seam they create must be aligned so that the top of the wing is flush to the table saw table along its entire length.


ARBOR SIZE AND ARBOR BEARINGS

          The saw blade is mounted on an arbor with an arbor nut and the arbor is turned by the motor usually via pulleys and 1 to 3 V-belts. The arbor is mounted into the trunnion inside two or more arbor bearings. These should be sealed from dust for obvious reasons. The size of the arbor determines the size of the hole in the middle of the saw blade. This is usually 5/8” for a 10” blade and 1” or larger for blades larger than that. The strength and alignment of the arbor and the bearings which support it determine the accuracy and smoothness of the table saw. Vibration and noise should be kept to a minimum and the saw blade should be straight in the table from front to back at all elevations and bevel angles.


BLADE TILT


          Most table saw trunnions are made to tilt either left or right (but not both) to a maximum of 45 degrees from vertical. If you have a choice, and you usually do, never buy a right-tilt saw for the following reason. A right-tilt saw tilts the blade towards the fence and can pinch a work piece into the fence, causing a jam or, worse, a kickback just as the cut is finishing. Further, on a right-tilt saw, the blade is tilting towards the fence and could cut into and ruin it if the fence were to be inadvertently moved too close to the spinning blade. A left-tilt saw tilts away from the fence and instead of pinching the work piece, allows it to rise vertically slightly, if need be.


KICKBACK AND PERSONAL SAFETY


          There is a rule that says, “Never stand directly behind a horse or a table saw.” Sooner or later every table saw operator will do something stupid that causes a kickback. If the operator makes it a practice to avoid standing where the kickback will occur behind the blade, he or she will probably avoid the severe injury that can be inflicted by a flying piece of wood striking the face, neck, chest or arms of the woodworker.


          There are many hold-down and anti-kickback devices on the market. Some are good and some are a hazard in themselves. I had a large metal combination hold-down and anti-kickback device get caught in the saw blade, ripped off the fence to which it was clamped and flung into a plate glass door behind the saw. I heard it go whistling past my right ear. It missed me because I was standing, as always, well to the left of the saw blade.


         Woodworking can be a dangerous business. Always use a push stick or similar device. Fingers are not replaceable. Never try to rip narrow strips next to the fence. Instead, cut them off of the left side of the work piece. In this case, you would stand to the right of the blade. In short, think ahead about the possible complications of what you are about to do, keep your eyes wide open (wearing goggles, of course) and keep your wits about you at all times.

          Another important safety device is the magnetic switch. This device protects you after an electrical power failure. If the power fails and you have a regular switch, the saw will come back on when the power comes back on. If you were to be near the blade at the time, this could be disastrous. A magnetic switch will not allow the saw to start again until you press the button. The location of the switch is also important. It should be right out front where it can be quickly accessed by a hand, foot or knee in the event of an emergency. The off button should be wide, red in color and should extend outside of the switch box like a mushroom for fast access.


SAWDUST EXTRACTION

          My ideal would be to never have a speck of dust reach the gears of my table saw trunnion and that all sawdust would be sucked away from the saw blade and out of the machine as soon as it was made. I would never need to clean out sawdust from inside the saw cabinet and the trunnion would always operate smoothly and easily. While I don’t expect to ever see my dream fully realized, there are saws on the market today that closely approach this level of efficiency in sawdust extraction.

          Some saws shield the blade in a casing underneath the saw table and suck the dust out directly from there. Others slant the floor of the saw cabinet towards a dust collection port. Many just allow the sawdust to accumulate on the floor under the saw until you clean it out. You will always have some cleaning of the interior to do. Perhaps you won’t wait until the sawdust has totally encased the trunnion gears packing itself up to the bottom of the table top. You will need to connect the saw to a dust collector through its dust port. The suction of the dust collector should be about 350 CFM for a 10” saw and more for a larger saw.


CABINET ACCESS


          At least one, but preferably two or more access doors should be provided leading into the cabinet of the table saw. The one you will use most often will be for cleaning out the interior of sawdust. Another should give easy access to the motor, trunnion and belts for adjustment and repair. Many saws provide a removable access panel instead of a second door. That’s fine for occasional motor, arbor, belt and trunnion access but you will want the sawdust door to open and close easily.


THE FENCE

          The saw should come with a Biesemeyer or similar type fence included in the purchase price. This type of fence locks and aligns itself to a rectangular tube attached to the front of the saw table when you press down on a handle. Fence accuracy and ease of operation will be important every time you touch your table saw and so a cheap fence is no bargain. The fence will probably read measurements along a stick-on measuring tape on the top of the front fence rail tube. You will need to carefully adjust the fence for accuracy. Instructions of how to do this should come with the set-up instructions for the saw.

          The fence must be aligned so that the front of the blade and the rear of the blade are exactly the same distance from the fence at all settings. Once you have ascertained that the blade and fence are parallel to each other, you must cut some test boards to accurately set the fence to the scale. Set the fence to exactly 2” on the measuring scale. Rip a test board and measure it. Adjust the fence to the scale by moving the viewer’s hairline left or right. Rip more boards until you have exact accuracy. The viewer through which you see the tape should be strong in magnification.


RIP CAPACITY


          Your new saw must have a rip capacity equal or wider than the widest thing you will ever want to rip. Usually, a cabinet saw will have a rip capacity of around 30 inches or 50 inches. A large rip capacity to the right of the blade will require an extension table to support work wider than the cast iron table. Many times, this extension table is included with the saw or, alternatively, you can easily build you own. The fence must have a tube or rail long enough to achieve the maximum with you want to rip.


          If you consider that a sheet of plywood measures 48” in width, I would think that you might want to opt for a 50-inch rip as opposed to the slightly less expensive 30” rip capacity. You might want to rip off only one inch from that sheet of plywood and, while doing that, you will want the plywood to be fully supported. You might want to crosscut a sheet of plywood into two 48” pieces. You also should consider the rip space to the left of the blade: The wider, the better. Sometimes, you might want to accomplish tasks that require the fence to be put over to the left side of the blade.


TABLE SAW MOBILITY


          Some shops are small enough to require that all machines be able to roll around on the floor. The theory is that you pull out only the machine you are using at the time. In planning your shop, you should decide if your space requirements will mean that everything has to roll, some machines but not others have to roll or all machines can remain in their own positions permanently. Many cabinet saws offer the optional extra of some sort of mobility device. In the case of a table saw, you don’t want it rolling around while you are pushing lumber through it and so the wheels must retract enabling the saw to rest on its cabinet base on the floor.


          Some of the nicer table saws have the caster wheels permanently mounted inside the cabinet so they are never seen and are never in the way. A foot pedal controls raising the saw up into the mobility position and then lowering it back down onto the floor. If your table saw does not have this feature, after-market mobility bases can be purchased as needed.


BUILDING AN OUTFEED TABLE


          The ideal solution is to have enough shop space so that you will never have to move your saw around at all. In this situation, you can construct an outfeed table to support large work pieces and long lumber as they leave the back edge of the table saw table. Ideally, depending on space available, you should build this outfeed table so that it extends eight feet or more in back of the blade. You can use the space underneath the table for lumber storage and/or drawer space. The table can also serve as a work bench for the construction of large cabinets and tables. You can use it for pipe clamp glue-ups and spray painting layout, as well.

          Needless to say, the table must be exactly the same height as the top of the table saw table and you may need to extend the slots for the miter gauge into the beginning of the top of the outfeed table. If your saw extension table extends 50 inches or so to the right of the blade, so should your outfeed table and it should extend along the entire back edge of the table saw to the left of the blade. The saw should ideally be oriented so that you can bring long lumber through the shop door and directly onto the saw table without having to turn a corner.


          If you keep what you have read here in mind, you should be able to find a machine that is perfect for your needs. Remember, cheap price guarantees neither satisfaction nor success.


Bob Gillespie

Woodworker

For similar articles and tool reviews see:

http://www.perfectwoodworking.com/


© 2010 Robert M. Gillespie, Jr.

How to Make a Miter Saw Table

          Miter saws can be used in a woodworking shop as a permanently installed tool or on the jobsite as a portable or semi-portable unit. I will discuss the construction of miter saw tables appropriate to both types of installations.


          The purpose of a miter saw table is two-fold: (1) to elevate the saw to a comfortable working height for the operator and (2) to provide a surface to the left and/or right of the saw for the extension of the fence and to provide support for long materials while being cut. If you have ever tried to cut a 45-degree miter at one end of a 2 x 6 x 12, you know why a miter saw table or roller stand is absolutely required.

          Very often, miter saws are used to make repetitive cuts of the same length. Some sort of saw stop comes in handy and greatly speeds production time for this sort of application. A saw stop must mount to something to hold it in place, usually a fence. You can make your own fence out of a very straight piece of wood or metal or you can do as I did and purchase a commercially available moveable stop that slides along an aluminum track that includes a stick-on measuring tape.


PERMANENT SAW TABLE FOR SHOP USE


          Since I buy lumber in lengths up to 14 feet long, I decided to build a very long miter saw table in my woodworking shop. You may not have the physical space for this in your shop so you may have to reduce my measurements accordingly. The longer you can build it, the better off it will be for you but any length of saw table is better than no table at all. My miter saw table measures 8 Feet to the left of the saw blade and another 8 feet to the right of the saw blade. This way, I can support the full length of a sheet of plywood on either side.

          The saw table is constructed over 2 x 4 framing and contains multiple storage drawers below the table which I use to store small tools and supplies. If you prefer, the space underneath the saw table can be left open for shelf space or lumber storage. I suggest that the top surface be 3/4" Melamine or Formica over 3/4" particle board. If you can use the entire 4-foot width of the Melamine or particle board, by all means do so, especially if your miter saw is of the “sliding compound miter” type. As for overall table height, I would suggest that you build the miter saw table so that the top of the table comes to your belt line when standing. This will give you a comfortable working height and still allow you to bend over the table.

          There should be a gap cut through saw table top in the area where the saw is to be mounted. This gap must be exactly as wide as the top of your miter saw and must be open to the front of the table. The gap should close behind the top of the miter saw. The saw must be mounted in this gap so that the top of the miter saw table is flush with the top of the saw table. The miter handle must be free to move its full travel in both directions, left to right.


          Anticipate the need for this gap as you are framing the underside of your miter saw table because you will need to construct a shelf underneath to support the weight of the miter saw. You might want to make this shelf adjustable in micro increments so that you can get the top of the saw platform exactly flush to the top of the saw table. You can do this with lag screws with washers in sliding slots through the shelf sub-structure and into the table framing. Slightly loosen the lags and tap the table up or down with a rubber hammer before tightening the lags fully. Use a long straightedge in all directions to make sure that the miter saw and the miter saw table are flush with each other. Mount the saw securely to the shelf using lag screws.


          Once the miter saw is mounted, you can begin to construct the fence or fences. A simple, inexpensive fence can be constructed using 1 x 4 or 1 x 6 clear fir boards. These boards should be hand selected for straightness and jointed on one edge. One board will be the actual fence and the other will keep it straight from behind. The fence sits with its jointed edge on the saw table top while the back-up board lies flat on the table, behind the fence, with its jointed edge joined to the bottom of the fence.


          Before joining the two boards together, slotted holes should be cut into the back-up board for the purpose of mounting and adjusting the fence position on the table top with reference to the fence on the miter saw. These slots should be slightly wider than the shaft diameter of the lag screws you intend to use to mount the fence to the table. Cut a few equally spaced slots in the back-up board perpendicular (at right angle) to the fence. A 2 x 4 joist should be located under the table top, centered underneath the slots in the back-up board. This will give the lag screws something solid to bite into.


          Before mounting the fence or fences to the miter saw table top, draw a pencil or chalk line where the front of the fence is to be positioned. Take a long straightedge, lay it flat on the miter saw’s metal table and push one edge of it long the miter saw’s metal fence. Keeping it in this position, draw a pencil line along the table top, out as far as possible. Repeat on the opposite side of the saw if you have tables on both sides of the saw. Extend this pencil line as far as possible.

          Place the fence along the pencil line with the end of the wooden fence almost touching the end of miter saw’s metal fence. (Leave a 1/16” gap between the wooden fence and the metal fence.) Drill appropriately sized holes for the lag screws through the table top and into the 2x4 joist underneath the table top (one for each slot). Screw the fence to the table loosely so that it can be adjusted. Use the long straight edge on the miter saw’s table and on the front of the fence to align the fence perfectly and screw down tightly. Repeat for the other side of the table if there is one.


          For the left fence, place a "right to left" reading stick-on measuring tape along the top of the fence. For the right fence, place a "left to right" reading stick-on measuring tape along the top of that fence. Before sticking down, the tapes must be aligned perfectly. The left tape is measuring the distance from the left side of the saw blade teeth and the right tape is measuring the distance from the right side of the saw blade teeth. With a simple wooden fence like this, you can use wooden stop blocks clamped to the fence with C-clamps for repetitive cuts.


          A slightly more expensive and far better alternative is to use a metal track or tracks with a flip-up stop and measuring tape built in. Such a device is manufactured by Kreg Tools and is available in 4-foot track lengths that can be butted together to make longer lengths. My miter saw table requires four 4-foot tracks, two for each side of the saw. The track is mounted to the top of the wooden fence you just made. You will have to adjust the height of the wooden fence (2 1/4"+ above the table top) so that the bottom of the flip-up stop clears the table by about 1/16” in the down position.


          The nice thing about the flip-up stop is that it can be flipped up out of the way without loosing its measurement setting along the measuring tape. If you were making repetitive cuts and you needed to stop to use the saw momentarily for a different kind of cut, you could resume your repetitive cutting immediately without losing any accuracy.


PORTABLE MITER SAW TABLE FOR JOBSITE USE

          A jobsite miter saw table is usually made with the saw mounted to the extreme right end of the table. I have found that most miter saw manufacturers make their metal table surfaces so that they are 3 1/2" above the table on which the saw is resting. A very straight, milled 4 x 4 (3 1/2" x 3 1/2") can be mounted onto the table top, almost abutting the left side of the metal table of the saw. The 4 x 4 should extend out the full length of the supporting table to the left and be mounted to the supporting table.


          A fence can be attached to the back side of the 4 x 4. Use a 1 x 6 or 1 x 8 clear fir board for this purpose. As in the permanent table above, the front of the fence must align perfectly with the miter saw’s metal fence. If a wider support surface is needed, a second 4 x 4 can be mounted directly in front of the one with the fence attached to it.

          A Kreg Trak system with a flip-up stop can also be used on this portable miter saw table. Just make sure the wooden fence is ripped to the proper height to allow the flip-up stop to clear the table by 1/16”. (Fence is 2 1/4" + above the top of the 4 x 4.)


          As for the support table, I have used a plastic fold-up table from Costco. They come in various sizes to suit your particular need. Or, you can make your own table out of 2 x 4’s and 3/4" plywood. Design it so that the legs can fold up for transportation and storage.


Bob Gillespie
Woodworker

For similar articles and tool reviews see:

http://www.perfectwoodworking.com/


©2010 Robert M. Gillespie, Jr.